Written by Shreya Chaudhary, originally posted on Medium.
What is pyTigerGraph?
pyTigerGraph is a Python wrapper for TigerGraph. With it, one can integrate the power of graph technology with Python notebooks and libraries including Tensorflow, pandas, etc.
Get Started
pyTigerGraph is available on pip. To download the library, simply type pip install pyTigerGraph into your terminal or !pip install pyTigerGraph on a notebook in Colab.
To use it in your notebook, type:
!import pyTigerGraph as tg
Next, to get started, start a solution in GraphStudio (check out Akash’s blog for a detailed walkthrough on how to do this). Once your solution is Started, in your notebook, type:
conn = tg.TigerGraphConnection(host="https://HOST_NAME.i.tgcloud.io", username="tigergraph", version="3.0.5", password="tigergraph", useCert=True)
NOTE: If your solution is not started, this line will NOT run, and it will likely result in a Timeout error. Make sure you have your solution Started to ensure its functionality.
The username and password are the credentials you used to start the box. The version is the current version of GSQL. Refer to this document to find the latest version.
Now that you’ve started, you can use all the command in the documentation to start a project. This blog will walk you through the basics of pyTigerGraph using an opioid dataset.
Modelling Opioid Data
Step I: Dataset
In this blog, we will use the opioid dataset from Kaggle. Reference the dataset here and download it:
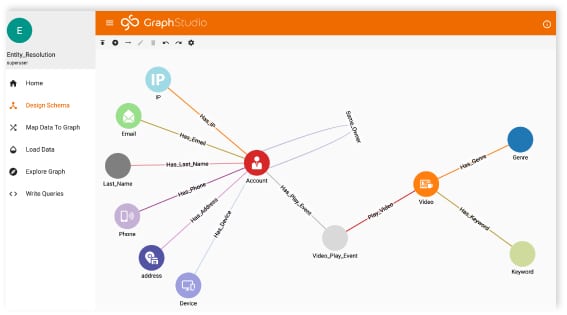
Step II: Graph Schema
Next, let’s create the graph schema. For the schema, we’re going to create a few nodes, including NPI, Gender, and State. To create a schema, use the conn.gsql command.
conn.gsql('''
CREATE VERTEX _NPI(PRIMARY_ID npi_id STRING) with primary_id_as_attribute="true"
CREATE VERTEX _Gender(PRIMARY_ID gender STRING) with primary_id_as_attribute="true"
CREATE VERTEX _State(PRIMARY_ID state STRING) with primary_id_as_attribute="true"
CREATE VERTEX _Credentials(PRIMARY_ID cred STRING) with primary_id_as_attribute="true"
CREATE VERTEX _Specialty(PRIMARY_ID spec STRING) with primary_id_as_attribute="true"
CREATE VERTEX _Opioid_Perscriber(PRIMARY_ID prescribed INT) with primary_id_as_attribute="true"   CREATE UNDIRECTED EDGE _NPI_GENDER(FROM _NPI, To _Gender)
CREATE UNDIRECTED EDGE _NPI_STATE(FROM _NPI, To _State)
CREATE UNDIRECTED EDGE _NPI_CRED(FROM _NPI, To _Credentials)
CREATE UNDIRECTED EDGE _CRED_SPEC(FROM _Credentials, To _Specialty)
CREATE UNDIRECTED EDGE _NPI_OPIOID(FROM _NPI, To _Opioid_Perscriber) CREATE GRAPH OpioidGraph(_NPI, _Gender, _State, _Credentials, _Specialty, _Opioid_Perscriber,_NPI_GENDER, _NPI_STATE, _NPI_CRED, _CRED_SPEC, _NPI_OPIOID)
''')
Step III: Loading Data
Next, we will load data. In GSQL, you can load data from a file, but we’re going to use the upsertVertexDataFrame. First, we’ll import pandas to create a dataframe of the Opioids.csv, then we’ll upsert the dataframe.
import pandas as pddf = pd.open_csv("Opioids.csv")npi = df["NPI"]
gender = df["Gender"]
state = df["State"]
cred = df["Credentials"]
spec = df["Speciality"]
prescribe = df["Prescriber"]v_npi = conn.upsertVertexDataFrame(npi, "NPI", "id", attributes={"NPI": "id"})
v_gender = conn.upsertVertexDataFrame(gender, "Gender", "id", attributes={"Gender": "id"})
v_state = conn.upsertVertexDataFrame(state, "State", "id", attributes={"State": "id"})
v_cred = conn.upsertVertexDataFrame(cred, "Credentials", "id", attributes={"Credentials": "id"})
v_spec = conn.upsertVertexDataFrame(spec, "Speciality", "id", attributes={"Speciality": "id"})
v_prescribe = conn.upsertVertexDataFrame(prescribe, "Prescriber", "id", attributes={"Prescriber": "id"})
Step IV: Check out Your Graph in Graph Studio!
Congrats, you’re finished! Now you can check out your graph in Graph Studio and more.
Make sure to join the TigerGraph Discord for help and more TigerGraph content!