


This article is Part 1 of a series of articles on integrating or using TigerGraph in a Full Stack application. Follow the Author on LinkedIn and Medium.
Graph Databases represent data in an intuitive manner and are exploding in popularity in recent times. Moreover, TigerGraph, a super fast, native, parallel graph database, has also seen incredible engagement and was named a “Cool Vendor” by Gartner. Through out these articles, we will walk through ways of harnessing TigerGraph’s analytical abilities and queries in a Full Stack application. In part 1, we will concern ourselves with simply setting up the back end.
Setup
We will be using the Free Cloud Instance as our instance of TigerGraph. You can learn how to set up a free TigerGraph cloud instance from this article written by Jon Herke.
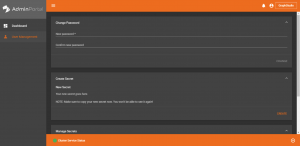
Now that the instance is up, we must generate the secrets and tokens, as we will need them to make requests to TigerGraph. There are a couple of steps we must follow. First, click on the Admin Button in the top right corner. You will now navigate to the Admin area, which looks like:
Now, click on User Management. Here, you shall see an area where you can generate a secret. Please generate the secret and copy it. The secret must never be exchanged or compromised and you must copy it right away when it is generated or you may have to generate another one.
We need to use the secret to generate a token. This token will be used for authorization when we make requests. We can do that by making a request to TigerGraph to generate a token.
curl -X GET 'HOST_NAME:9000/requesttoken?secret=SECRET&lifetime=1000000'
For the fields HOST_NAME and SECRET, you must fill them out based on your TigerGraph Cloud Instance URL as well as the secret you copied. Here is an example for a given url and secret below:
url = https://blank-test.i.tgcloud.io:14240/#/home
secret = blank1231

curl -X GET https://blank-test.i.tgcloud.io:9000/requesttoken?secret=blank1231&lifetime=1000000
If the command runs successfully, TigerGraph will return a response with your generated token. Now that most of our setup is complete, let’s take look at one way of calling our TigerGraph query end points.
Method
Although there exist many different methods of calling the query endpoints, I believe that having a server in between which takes in the requests from the Front End and then calls to TigerGraph would be a good option, since the tokens are at one secure place, the server, and there is a chance to cache certain requests or computations which remain fairly constant. We will dive a bit deeper on the idea of caching in the next part of the Full Stack TigerGraph series.
Although there are many ways one can create this middle server, we shall use NodeJS and Express for this article. So, in the end, here is how our Request flow looks like.
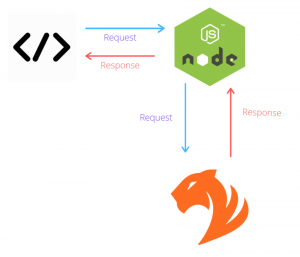
ExpressJs is a web framework for NodeJS to handle requests, routing and much more. Please take a look at the documentation of it if you are unfamiliar.
Execution
I will assume that you have npm installed and working. First, let’s begin by creating a new NodeJS project.
npm init
Npm will now prompt you fill out your package.json information, please do so. Now, we will install express.
npm install express --save
If the install went smoothly, express will show as a dependency in your package.json.
Let’s create a file that corresponds to main key in your package.json, which would be index.js for me.
In index.js, let’s start by creating an express app and making it listen on port 5000 locally.
const express = require("express");
const app = express();
console.log("Listening...");
app.listen(5000);
At anytime you can run the app by using the following command:
node FILE
node index.js (For my project)
Now that the app is listening, let’s start by creating a GET endpoint where we will make a request to TigerGraph.
app.get("/profile/:id", async(req, res)=>{
});
To give a bit of context, suppose in our graph we have a query called getProfile which takes a parameter person and returns data about the profile based on that id. We want to be able to make a request to the getProfile endpoint and pass in the id parameter we receive from the request the client makes to our express server.
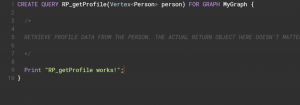 The graph schema, parameters and what not do not matter. This is just for an example.
To put it simply, from our route “/profile/:id” we must grab the id from the route parameters and use the id for the parameter person to the getProfile endpoint. Let’s start coding away!
First, let’s make a config file for our TigerGraph credentials. Simply make a file called config.js, and then place the credentials in the file. This is how I did it:
const TigerGraphCred = {
token: "TOKEN",
secret: "blank1231",
queryUrl: "https://https://blank-test.i.tgcloud.io:9000/query/"
}
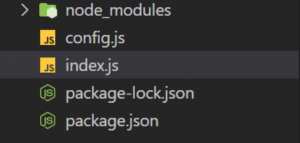
module.exports = TigerGraphCred;Here is what my folder structure looks like:
Let’s head back into index.js and write out the function.
const express = require("express");
const app = express();
const TigerGraphCred = require("./config.js");
const fetch = require("node-fetch");

app.get("/profile/:id", async(req, res)=>{
const person = req.params.id;
const reqUrl = TigerGraphCred.queryUrl + `RP_getProfile?person=${person}`;
const response = await fetch(reqUrl, {
headers:{
"Content-Type": "application/json",
"Authorization": `Bearer ${TigerGraphCred.token}`,
"Accept":"application/json"
}
});

if(response.status === 200){
const json = await response.json();
//query for the error and send appropriate status code and response
if(json.error){
res.status(400).send({"error": json.message});
}
else{
res.status(200).send(json);
}
}
else{
const message = await response.text();
res.status(500).send({'error': message});
}
});

app.listen(5000);
To elaborate, we are using the fetch api to make a HTTP GET request to our TigerGraph query endpoint. Then, after that, we are essentially checking the status of our request and if any errors are present. Finally, if TigerGraph responded with a status code of 200 and if no run-time errors came, then we can return the JSON response from the TigerGraph request.
Conclusion
A huge thank you for reading this article. This is the first of a series of articles that will navigate through building a Full Stack application with TigerGraph. Please let me know if you liked or disliked some part of the article and how I can improve.
Read Part 2 here: https://www.tigergraph.com/2020/06/07/designing-feed-relationships-with-graph-databases-full-stack-tigergraph-part-2/