
Summary
- Most AI agents are stateless, relying on short conversation histories or vector similarity search that cannot preserve relationships, dependencies, or evolving context across sessions.
- A context graph represents agent memory as a network of entities, relationships, and events, enabling agents to answer questions like “What did this user change, what systems were affected, and how does that relate to the current request?” rather than simply finding similar past conversations.
- This tutorial walks through five steps: designing the context graph schema, connecting to TigerGraph via the MCP Server, writing the context retrieval function, writing the context update function, and running the complete agent loop.
- TigerGraph’s MCP Server exposes graph operations as native agent tools, making the memory layer framework-independent and usable with LangChain, LlamaIndex, OpenAI Agents SDK, or a direct LLM API.
- After only a few conversation turns, an agent with graph-native memory produces noticeably richer and more personalized responses because it remembers connected facts, tracks changes over time, and reasons across relationships rather than rediscovering information from scratch.
One of the biggest limitations of today’s AI agents is that they forget. Most current AI agents are fundamentally stateless, relying on short conversation histories or vector-based memory that retrieves information based on semantic similarity. While effective for finding related text, these approaches struggle to preserve the relationships, dependencies, and evolving context needed for intelligent reasoning.
A context graph helps solve this by representing memory as a network of entities, relationships, and events rather than isolated messages. “What previous conversation is similar?”, a context graph can answer, “What did this user change, what systems were affected, and how does that relate to the current request?”
In this context graph tutorial, you’ll build a TigerGraph-backed context graph that an AI agent reads before every response and updates after every interaction. By giving agents persistent, relationship-aware memory, TigerGraph enables them to reason across connected users, entities, documents, and events, providing richer context than conversation history or similarity-based retrieval alone.
The Context Graph We Are Building
This context graph tutorial walks through building a TigerGraph context graph that serves as a persistent memory layer for an AI agent.
Instead of relying on flat conversation logs or vector similarity search, the agent maintains a structured representation of what it knows, allowing it to preserve context across conversations and reason over relationships rather than isolated pieces of text. This connected representation forms the agent’s graph-native memory layer, allowing it to preserve relationships across conversations instead of treating each interaction independently.
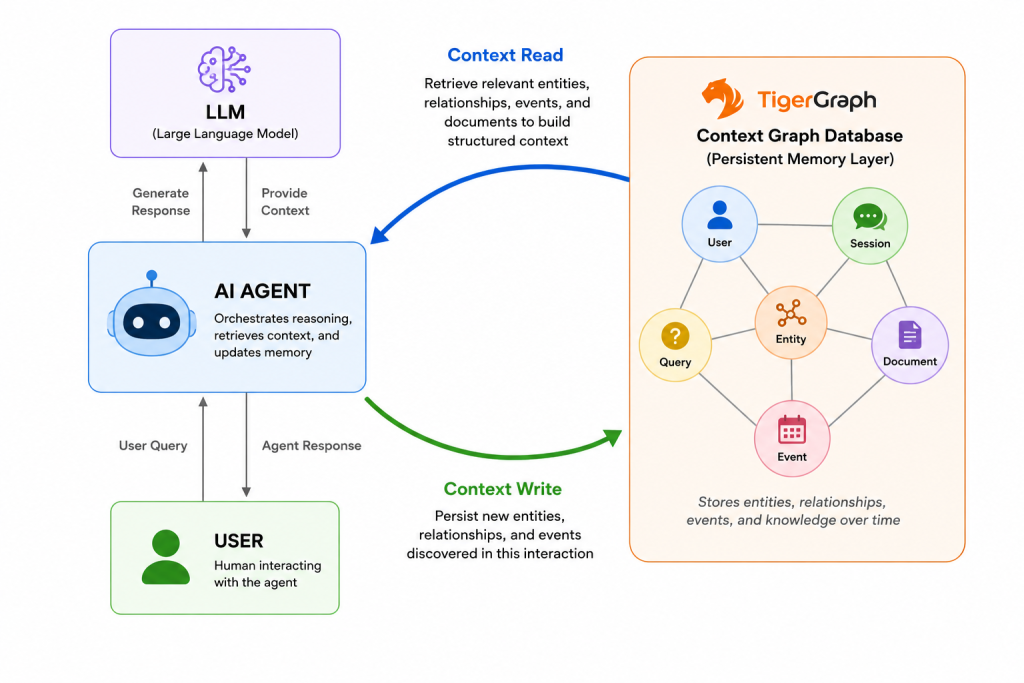
The context graph is organized around six core entity types:
- User represents a persistent identity across every conversation.
- A session captures a single interaction between the user and the agent.
- A query is how each user request is stored.
- Entities are named people, organizations, products, or concepts extracted from both prompts and responses.
- The document node represents external knowledge sources retrieved to answer a query.
- Event records important interactions, updates, or state changes that occur over time.
Together, these entities create a continuously evolving world model that reflects both conversational history and connected knowledge. The agent interacts with these entity types, i.e., the context graph, twice during every conversation turn.
Before generating a response, the agent performs a context read that follows relationship paths across the graph to retrieve relevant users, entities, documents, events, and relationships that provide structured context for the LLM. After responding, it performs a context write, adding newly discovered entities, linking them to existing knowledge, and recording important events, making the graph progressively richer with each interaction.
By the end of this tutorial, you’ll have an AI agent memory graph that demonstrates the value of an agentic memory graph database. After only a few conversation turns, the agent is able to produce noticeably richer and more personalized responses because it remembers connected facts, tracks changes over time, and reasons across relationships instead of simply retrieving semantically similar text chunks.
Prerequisites
Before getting started, make sure to:
Click on the “Start free” button to create your own TigerGraph’s elastic cloud database with separate storage. For further instructions, refer to Savanna’s documentation.
- Choose a working LLM application or agent framework
TigerGraph connects to popular AI frameworks and LLMs, including LangChain, LlamaIndex, and direct LLM API access.
- Make sure to have Python 3.9 or later installed
- Run your TigerGraph MCP server
Make sure to configure the server before starting to build the AI agent, so you can retrieve from and manage your TigerGraph database as a native tool from there.
Step 1 – Design the Context Graph Structure
When creating a new graph, it is important to think about its structure and model. For those familiar with relational databases, it is important to note that graph data modeling has several components, such as entities and relationships.
For this tutorial, you need to create the following:
Entity types
| Type | Description | Attribute |
| User | The persistent identity that exists across all sessions. | User ID, name, first-seen timestamp. |
| Session | A single conversation instance tied to a user. | Session ID, start time, end time, topic summary. |
| Query | An individual user message within a session. | Session ID, start time, end time, topic summary. |
| Entity | A named entity extracted from queries or responses (e.g., product names, people, concepts, locations). | Entity ID, name, type, first mention timestamp. |
| Document | A knowledge source retrieved during a query (e.g., a database record, a document chunk). | Document ID, source, relevance score. |
| Event | A notable interaction or state change worth tracking across time. | Event ID, type, timestamp, description. |
Relationship types
| Type | What it does |
| User -[HAS_SESSION]-> Session | Links a user to all their conversation sessions. |
| Session -[CONTAINS]-> Query | Links a session to all queries made within it. |
| Query -[EXTRACTED]-> Entity | Records named entities the agent pulled from a given query or its response. |
| Entity -[RELATED_TO]-> Entity | Connects entities that co-occur or have a known relationship, building a knowledge sub-graph over time. |
Note that the entity and relationship types are modeled after what the agent needs to reason about, not what is convenient to store. A flat event log is easy to write, but hard to query with context.
A good graph structure lets the agent ask precise relational questions before each response, reducing unnecessary retrieval and reasoning cycles. This is exactly the architectural payoff of relational memory over repeated vector similarity calls.
Step 2 – Connect the Agent to TigerGraph
As part of the prerequisites, you have created a TigerGraph MCP server. This tool exposes TigerGraph operations that the agent can call natively, so that the agent does not need to manage raw database queries itself. It is the “Let your AI build, retrieve from, and manage your TigerGraph DB” capability.
You can install the MCP server from PyPI using the following command in Shell:
pip install tigergraph-mcp
Then, use your Savanna connection credentials (host, port, graph name, credentials) to configure the server. You can test it with these command lines:
from pyTigerGraph import TigerGraphConnection
conn = TigerGraphConnection(
host=”https://<your-savanna-host>”,
graphname=”AgentMemory”,
username=”<username>”,
password=”<password>”
)
print(conn.getVersion())
print(“Successfully connected to TigerGraph!”)
If the connection succeeds, you’re ready to start building the agent’s persistent memory layer.
Throughout the remainder of this tutorial, the AI agent will repeatedly use three core graph operations exposed through the MCP Server.
- read_context retrieves the structured memory required before every response. Rather than searching for similar conversations, it follows the graph’s relationship paths to collect previous user sessions, related entities, prior events, and supporting documents, giving the LLM a connected view of everything relevant to the current request.
- write_interaction runs after each conversation turn. It persists newly discovered entities, creates relationships between existing nodes, records important events, and updates the agent’s world model so future conversations benefit from richer context.
- query_relationships enables the agent to reason over connected data by asking how two or more entities relate to one another. This is the core graph reasoning capability, allowing the agent to answer questions that depend on following multiple relationship paths rather than retrieving isolated documents.
One advantage of the TigerGraph MCP Server is that its integration layer is framework-independent. Whether you’re building your agent with LangChain, LlamaIndex, OpenAI Agents SDK, or a direct LLM API, the interaction model remains the same: the agent invokes graph tools through MCP, while TigerGraph handles the underlying graph operations. This lets you focus on building intelligent agent behavior instead of managing database queries, making graph-native memory a reusable component across virtually any modern AI stack.
Step 3 – Write the Context Retrieval Function
Before the agent generates a response, it queries the TigerGraph context graph for everything it already knows that is relevant to the current user and request. This is the job of the read_context() function.
Given the current user ID and query, read_context() follows the relationship paths defined in Step 1 to assemble a structured context object: recent session summaries, active and related entities, prior events, and supporting documents that were previously retrieved on related topics. The result gives the LLM a connected picture of the user’s history without appending a raw conversation transcript.
# Writer: insert read_context() implementation here
The function returns a structured context dictionary that is passed directly to the prompt-building step in the agent loop. Step 5 shows how this context object is injected into the LLM prompt before generation.
Step 4 – Write the Context Update Function
The second half of a graph-native memory system is writing context back to the graph after the agent responds. Once the LLM generates its answer, the interaction becomes new knowledge that should be preserved for future conversations. Rather than storing another message in a conversation log, the agent updates the TigerGraph context graph, enriching its understanding of the user and their world with each interaction.
The write_interaction() function begins by performing a lightweight Named Entity Recognition (NER) pass over both the user’s query and the agent’s response. This identifies key entities such as people, organizations, products, locations, projects, and technical concepts discussed during the conversation.
import spacy
nlp = spacy.load(“en_core_web_sm”)
def extract_entities(text):
doc = nlp(text)
return [
{“name”: ent.text, “type”: ent.label_}
for ent in doc.ents
]
entities = (
extract_entities(user_query) +
extract_entities(agent_response)
)
Next, the function upserts these entities into the graph. If an entity already exists, its metadata (such as the last seen timestamp) is updated. Otherwise, a new Entity node is created.
for entity in entities:
conn.upsertVertex(
“Entity”,
entity[“name”],
{
“type”: entity[“type”],
“last_seen”: datetime.utcnow().isoformat()
}
)
The function then creates a new Query node containing the query text, timestamp, and intent label, and connects it to the current Session using a CONTAINS relationship.
query_id = str(uuid.uuid4())
conn.upsertVertex(
“Query”,
query_id,
{
“text”: user_query,
“intent”: detected_intent,
“timestamp”: datetime.utcnow().isoformat()
}
)
conn.upsertEdge(
“Session”,
session_id,
“CONTAINS”,
“Query”,
query_id,
{}
)
Once the query is stored, the function creates EXTRACTED relationships linking the Query node to every entity identified during the interaction:
for entity in entities:
conn.upsertEdge(
“Query”,
query_id,
“EXTRACTED”,
“Entity”,
entity[“name”],
{}
)
If the agent retrieved external knowledge while generating its response, Document nodes are created or updated as needed, and RETRIEVED relationships connect those documents to the query.
for doc in retrieved_documents:
conn.upsertVertex(
“Document”,
doc[“id”],
{
“title”: doc[“title”],
“source”: doc[“source”]
}
)
conn.upsertEdge(
“Query”,
query_id,
“RETRIEVED”,
“Document”,
doc[“id”],
{}
)
Finally, entities that appeared together in the same interaction are connected through RELATED_TO relationships, strengthening the graph’s representation of how concepts, people, and events are associated.
from itertools import combinations
for source, target in combinations(entities, 2):
conn.upsertEdge(
“Entity”,
source[“name”],
“RELATED_TO”,
“Entity”,
target[“name”],
{}
)
Writing context back to the graph is what makes the memory layer adaptive. Every conversation adds new entities, relationships, and evidence, making the graph denser and more informative over time. As a result, future calls to read_context() retrieve an increasingly richer context because previous interactions have become part of the agent’s persistent world model.
This is an adaptive agentic memory graph database: instead of repeatedly rediscovering information, the agent continuously learns from its interactions, allowing its reasoning capabilities to compound over time.
Step 5 – Run the Agent Loop
With both the context retrieval and context update functions in place, the final step is to combine them into a complete agent loop. Instead of treating every prompt as an isolated request, the agent continuously reads from and writes to the TigerGraph context graph, allowing its memory to evolve with every interaction.
Each conversation begins by calling the read_context() function developed in Step 3. Given the current user ID and query, the function retrieves a structured context object containing recent session summaries, active entities, related entities, and previously retrieved documents. Rather than relying solely on the current prompt, the agent starts each interaction with a connected understanding of the user’s history.
Next, this context is injected into the LLM prompt as structured information. Instead of appending an entire conversation transcript, the prompt contains the most relevant graph-derived context, giving the model a concise but comprehensive view of previous interactions and their relationships.
context = read_context(user_id, user_query)
prompt = build_prompt(
query=user_query,
context=context
)
response, retrieved_docs = llm.generate(prompt)
Once the response has been generated, the agent immediately calls the write_interaction() function from Step 4. The user’s query, the generated response, and any supporting documents are written back into TigerGraph, creating new nodes and relationships that become available during future conversations.
write_interaction(
session_id=session_id,
user_query=user_query,
agent_response=response,
retrieved_documents=retrieved_docs
)
return response
This creates a continuous read → reason → write feedback loop in which every interaction strengthens the agent’s future reasoning by enriching its connected memory.
To see this in practice, consider the following three-turn conversation:
- Turn 1: The user asks how to configure a product. Because this is the first interaction, the agent has no prior context. It retrieves relevant documentation, generates a response, and writes the interaction to the graph. The graph now contains the User, Session, Query, extracted entities such as the product name and configuration type, and the supporting documents used to answer the question.
- Turn 2: The user asks how to change a specific setting for the same product. Before responding, the agent retrieves the previous interaction from the graph. It already knows which product and configuration the user is working with, so it doesn’t need to infer or rediscover that information. After responding, the graph is updated with a new Query, additional entities, and a RELATED_TO relationship connecting the new setting to the existing product configuration.
- Turn 3: The user asks, “What did I change during my last session?” A traditional AI assistant would likely need to search previous conversations or retrieve documents again. In contrast, the graph-native agent follows the context graph’s relationship paths: it finds the user’s recent sessions, retrieves the associated queries, identifies the entities modified during those interactions, and returns a direct, traceable answer. Because every decision is grounded in explicit nodes and relationships, the agent can explain not only what changed but also how it arrived at that conclusion.
This illustrates the core advantage of graph-native memory. The agent’s responses improve across successive interactions, not because the LLM itself becomes more capable, but because the context graph continuously provides richer, relationship-aware context. Better context enables better reasoning, reduces unnecessary retrieval and repeated inference, and produces responses that are more accurate, personalized, and explainable over time. This is one of the core advantages of TigerGraph context engineering.
What You’ve Built and Where to Go Next
In this tutorial, you’ve built a graph-native memory layer that gives an AI agent persistent, relationship-aware memory. Instead of relying solely on conversation history or vector similarity, your agent now stores users, sessions, queries, entities, documents, and their relationships in TigerGraph. With every interaction, the graph grows richer, enabling the agent to answer relational questions such as who was involved, what changed, and how concepts are connected. These are capabilities that traditional vector memory struggles to provide.
This architecture establishes a reusable foundation for persistent, graph-native agent memory that can scale from a single assistant to enterprise multi-agent systems. By allowing multiple agents to read from and write to the same context graph, you can create shared memory for Enterprise Knowledge Agents, Supply Chain Operations Agents, and Customer Intelligence Agents. Adding timestamps to events enables temporal reasoning, allowing agents to answer questions like “What happened last week?” or “Which entities were discussed most frequently this month?”
You can also apply TigerGraph’s graph analytics to identify high-value entities that appear across many sessions or connect to many other concepts, helping agents prioritize the information that matters most. The same graph-native memory pattern also powers domains such as fraud investigation and IT operations, where understanding relationships across entities and events is essential.
With this tutorial, you have tested TigerGraph Savanna, the fully managed cloud-native TigerGraph database, and paired it with the TigerGraph MCP Server to give any AI agent or LLM framework persistent, relationship-aware memory, all without managing infrastructure. From there, you can scale from a single intelligent assistant to teams of collaborative agents powered by a shared context graph.
FAQs
What is a context graph?
A context graph is a graph database structure that represents an AI agent’s memory as a network of entities, relationships, and events rather than as flat conversation logs or vector embeddings. Instead of storing what was said, a context graph stores who was involved, what entities were mentioned, how those entities relate to each other, and what changed over time. This allows an agent to answer relational questions across sessions rather than relying solely on semantic similarity to past conversations.
How is graph-native memory different from vector memory in AI agents?
Vector memory retrieves information by finding content that is mathematically similar to the current query. It works well for finding related documents or past conversations on similar topics, but it cannot answer questions about relationships between specific entities or changes over time. Graph-native memory stores explicit connections between users, sessions, entities, and events, so the agent can directly answer questions like “What did this user configure last week?” or “Which concepts appeared together in this user’s previous sessions?” without rediscovering that information through repeated similarity searches.
Do I need a TigerGraph Savanna account to follow this tutorial?
Yes. This tutorial uses TigerGraph Savanna as the managed cloud database for the context graph and the TigerGraph MCP Server to expose graph operations to the agent. Both are available through TigerGraph’s free tier. You can create a Savanna account at tigergraph.com/savanna and configure the MCP Server using the credentials provided during account setup.
Can I use this context graph pattern with any LLM framework?
Yes. The TigerGraph MCP Server exposes graph operations as framework-independent tools. Whether you are using LangChain, LlamaIndex, the OpenAI Agents SDK, or a direct LLM API, the agent interacts with the context graph through the same MCP interface. You do not need to rewrite the memory layer when switching frameworks or models; the graph operations remain the same across the entire stack.
How do I extend this architecture for multi-agent systems?
The simplest extension is to allow multiple agents to read from and write to the same TigerGraph context graph. Because each agent interacts with shared entity and relationship nodes, a research agent, a risk evaluation agent, and an execution agent can all share context without duplicating retrieval. You can assign agent-type labels to Event nodes to track which agent recorded each interaction, and use RELATED_TO relationships to surface entities that one agent discovered and another should prioritize.