


Launching a dashboard to visualize South Korea Covid-19 Data using TigerGraph, Streamlit, and Google Colab
Originally posted on Medium by Akash Kaul and Rohan Shiva
Introduction
Creating a nice, clean, polished dashboard is a skill every programmer wants to have. Being able to translate raw data into a visual that’s easy to understand is a hard task. Plus, most dashboards require knowledge of HTML, CSS, and JavaScript, along with inherent UI design skills.
In an effort to make this process easier, we created a framework for making a shareable dashboard for proof-of-concept use cases.
Let’s look at the specific technologies in play.
Streamlit
Streamlit is a Python framework that makes creating dashboards easier than ever. It lets you create a full, interactive dashboard without ever touching HTML or JS. Streamlit internally handles all of the front-end code and reduces complex structures to one-line functions. This allows everyone to create impressive dashboards with only a few lines of Python.
We used Streamlit for the front-end aspect of the Dashboard.
TigerGraph
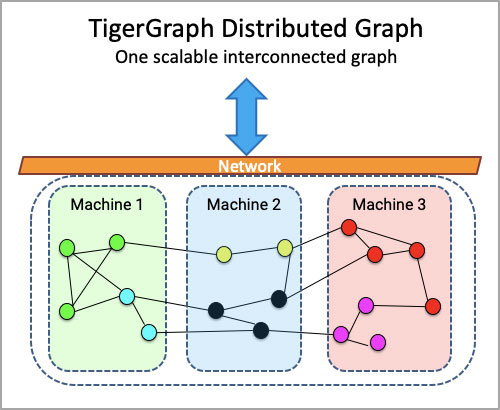
TigerGraph is the fastest graph database platform in the world. With TigerGraph, you can create graphs with billions of nodes and edges that operate in realtime. TigerGraph also makes use of GSQL, their own graph query language that mimics SQL syntax and allows for quick and easy querying of graph data.
We used TigerGraph to store our data. Specifically, we used the Covid-19 Starter Kit from TigerGraph, which has Covid-19 data from the Korean Centers for Disease Control & Prevention (KCDC),
Google Colab
Google Colab is a free, cloud-based, Jupyter notebook environment. With Colab, you can create Python scripts without having to worry about disk space and RAM on your local machine. Additionally, like any file stored in Google Drive, Colab notebooks are completely sharable.
We used Google Colab to make the dashboard shareable and allow each user to have their own copy.
Now, let’s walk through the process of launching the dashboard. The entire process takes about 15 minutes and no requires no code, making it accessible to everyone.
Outline
- Creating a TigerGraph Cloud Account
- Choose Covid-19 Starter Kit
- Loading Data Into the Graph
- Creating the Streamlit Dashboard
- Running the Google Colab Notebook
- Exploring your dashboard
1. Creating a TigerGraph Cloud Account
The first step is creating a TigerGraph Cloud account. Head over to the TigerGraph signup page and follow the steps provided.
You can also watch this demo if you get lost along the way.
2. Choose Covid-19 Starter Kit
Once your account has been created, you need to create a graph database. Start by clicking the My Solutions button and choose the Covid-19 Analysis starter kit.
3. Loading Data Into the Graph
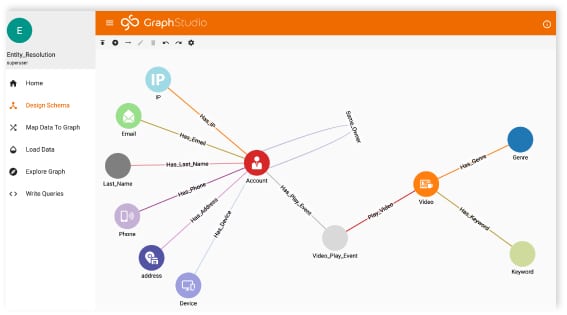
Once it’s ready, load GraphStudio and click the Load Data tab. Hit the play button, and the data will start loading.

Once done, the graph is now good to go. There are lots of other tabs that let you explore the graph and the data. There are also a number of premade queries that show off the native GSQL used by TigerGraph.
We’ll skip over these features for now, and move on to creating the visualization.
4. Creating the Streamlit Dashboard
Luckily, the script to create the streamlit dashboard is already written. If you want to see how the dashboard was made, check out this blog by Rohan Shiva. Next, continue to the premade Google Colab notebook.
5. Running the Google Colab Notebook
When you start up the notebook, you’ll come across a form asking for the information for your graph instance.

Once you enter your information, hit the Launch Dashboard button. This will start the loading process. The program will take about 2 minutes to load.

You may be wondering, what’s happening behind the scenes?
- The code first installs the pyTigerGraph Python package. This package simplifies the TigerGraph connection process and lets you call TigerGraph functions in Python
- The code then grabs other packages like Streamlit
- Next, it grabs the script for the Streamlit dashboard and the corresponding query that extracts information from the graph.
- Then, using pyTigerGraph, the query is uploaded to the graph
- Finally, the code configures a secure tunnel using ngrok to deploy the streamlit app. Normally streamlit is deployed locally, but the localhost can’t be accessed from Google Colab (since it’s a cloud environment). Thus, we use ngrok to link the localhost to a live website.
6. Exploring your Dashboard
Once the loading has taken place, the dashboard is good to go. Hit the link provided, and you’ll be brought to a webpage with the Streamlit visualization. You now have a full stack app at your disposal!
Conclusion
We presented a general framework for creating readily-deployable, premade dashboards. The entire process takes about 15 minutes and requires no code, making it accessible to everyone. This process can be applied to other technologies as well, as long as the 3 main components are me: