


Launching Your Solution
After provisioning the solution, the main dashboard will display a list of all the solutions in your organization. You’ll need to wait until the solution status changes to “Ready” to use it. Once your solution is ready, the first “Action” button contains the option to launch GraphStudio.
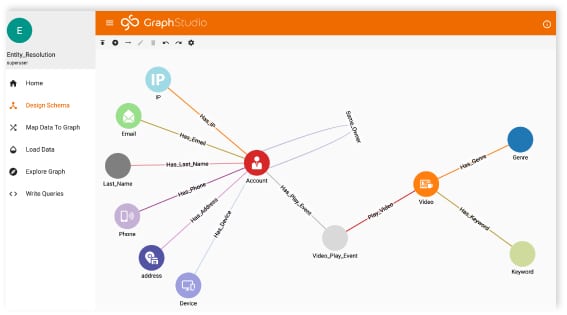
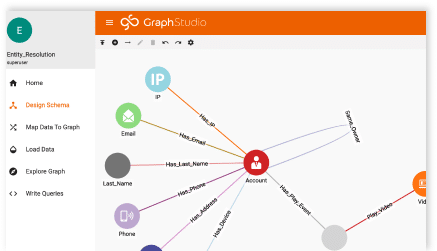
The GraphStudio interface looks similar to before, except that you won’t be asked to provide a username and password. Instead, GraphStudio now automatically authenticates you from TigerGraph Cloud. Because of this, if you leave your solution for a while and then return, you may receive a “User Authentication Failed” error. If this happens, simply return to TigerGraph Cloud, ensure you are still logged in, and then relaunch GraphStudio.
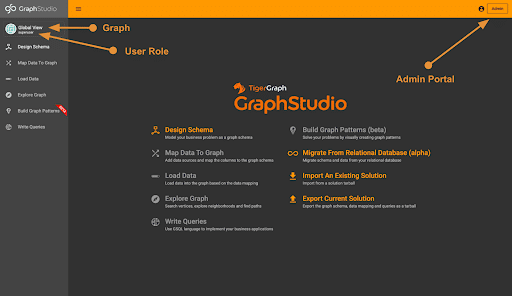
A few things to note about GraphStudio: at the top left, you’ll find the graph(s) a user has access to. Currently, the graph is in global view, but by clicking where it says “Global View,” a dropdown with all the graphs the user has access to appears. In addition, below the graph name is the user’s role. Finally, at the top right corner is a button to access the Solution Admin Portal. This is the same portal as in the dropdown used when accessing GraphStudio and is an alternative method to access the portal.
Making the Most Out of TigerGraph Cloud’s Latest Features
The latest TigerGraph Cloud release made it easier to build your graph-based solution as well as work inside of the platform. Let’s take a closer look at some of the improvements you’ll find as you explore TigerGraph Cloud.
Collaboration
One of the biggest new features in TigerGraph Cloud is the ability to give multiple users access to your solutions in TigerGraph Cloud. For this ability, there are two levels of access:
- Organization Permissions (Roles: Organization Member, Organization Solution Admin, or Organization Admin)
- Solution Permissions (Roles: superuser, observer, admin, query reader, etc. or custom role)
Organization permissions give users access to TigerGraph Cloud and the organization, whereas solution access gives users access to specific graphs on specific solutions. All users must have an organization role to obtain solution permissions.
When creating a TigerGraph Cloud account, you’re prompted to add organization members. You can also add members to your account easily using its built-in user management by clicking “Users” in main navigation menu and following the prompts.
Inviting users to your TigerGraph organization will require you to supply their email addresses. Invited users will receive a unique URL to click. When they select the link, they will be prompted to create a password or log into an existing account.
Once users are added to the organization, they can next be added to available solutions in the organization. Remember to choose the appropriate roles for your users!
Creating and Assigning Custom Roles
To create and assign custom roles to users, which gives you even greater control over the security of your TigerGraph environment, you’ll need to access the Solution Admin Portal either inside GraphStudio or by using the first “Actions” dropdown in TigerGraph Cloud. Navigate to Management > Users and switch to the tab labeled User-defined Roles.
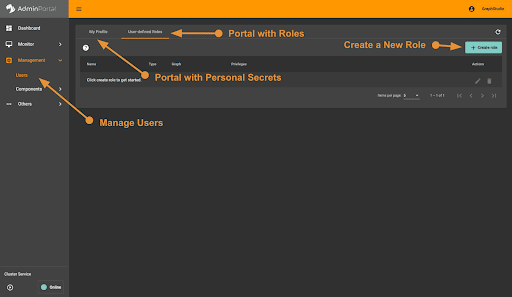
This page has two tabs. The “My Profile” tab consists of the personal secrets you created to access the solution via different tools, such as pyTigerGraph. To enter credentials in external tools such as pyTigerGraph, your username must be __GSQL__secret, and the password must be your secret. To create a role, however, you must access the “User-defined Roles” tab. In the tab, create a new role using the blue “Create role” button.

Creating a role takes three parameters: the role name, the role type (global or a specific graph), and the role privileges. If needed, you can also select different privileges for multiple local graphs.
You’re on Your TigerGraph Cloud Journey!
I hope this article has been a helpful starting point for you to learn more about TigerGraph Cloud and some of its new features.
If you have questions along the way, feel free to ask in the TigerGraph Community Forum or the TigerGraph Discord to contact TigerGraph engineers directly. Furthermore, you can visit TigerGraph’s Office Hours (the TigerGraph Graphé) every Tuesday on the TigerGraph Discord from 9:30-10:30 am CST.